When we began working on the NGINX Modern Apps Reference Architecture (MARA) project, we chose AWS as our IaaS provider because we were already familiar with the platform and we could use our departmental budget to pay for it. Not everyone has the same the same experience or budget, of course, and many of you have asked us to provide options for running MARA locally – in a lab‑based environment or even on a workstation – with Kubernetes distributions such as K3s, Canonical MicroK8s, and minikube.
We heard you and today we’re pleased to announce that we have tested MARA on MicroK8s and are providing instructions so you can deploy it yourself!
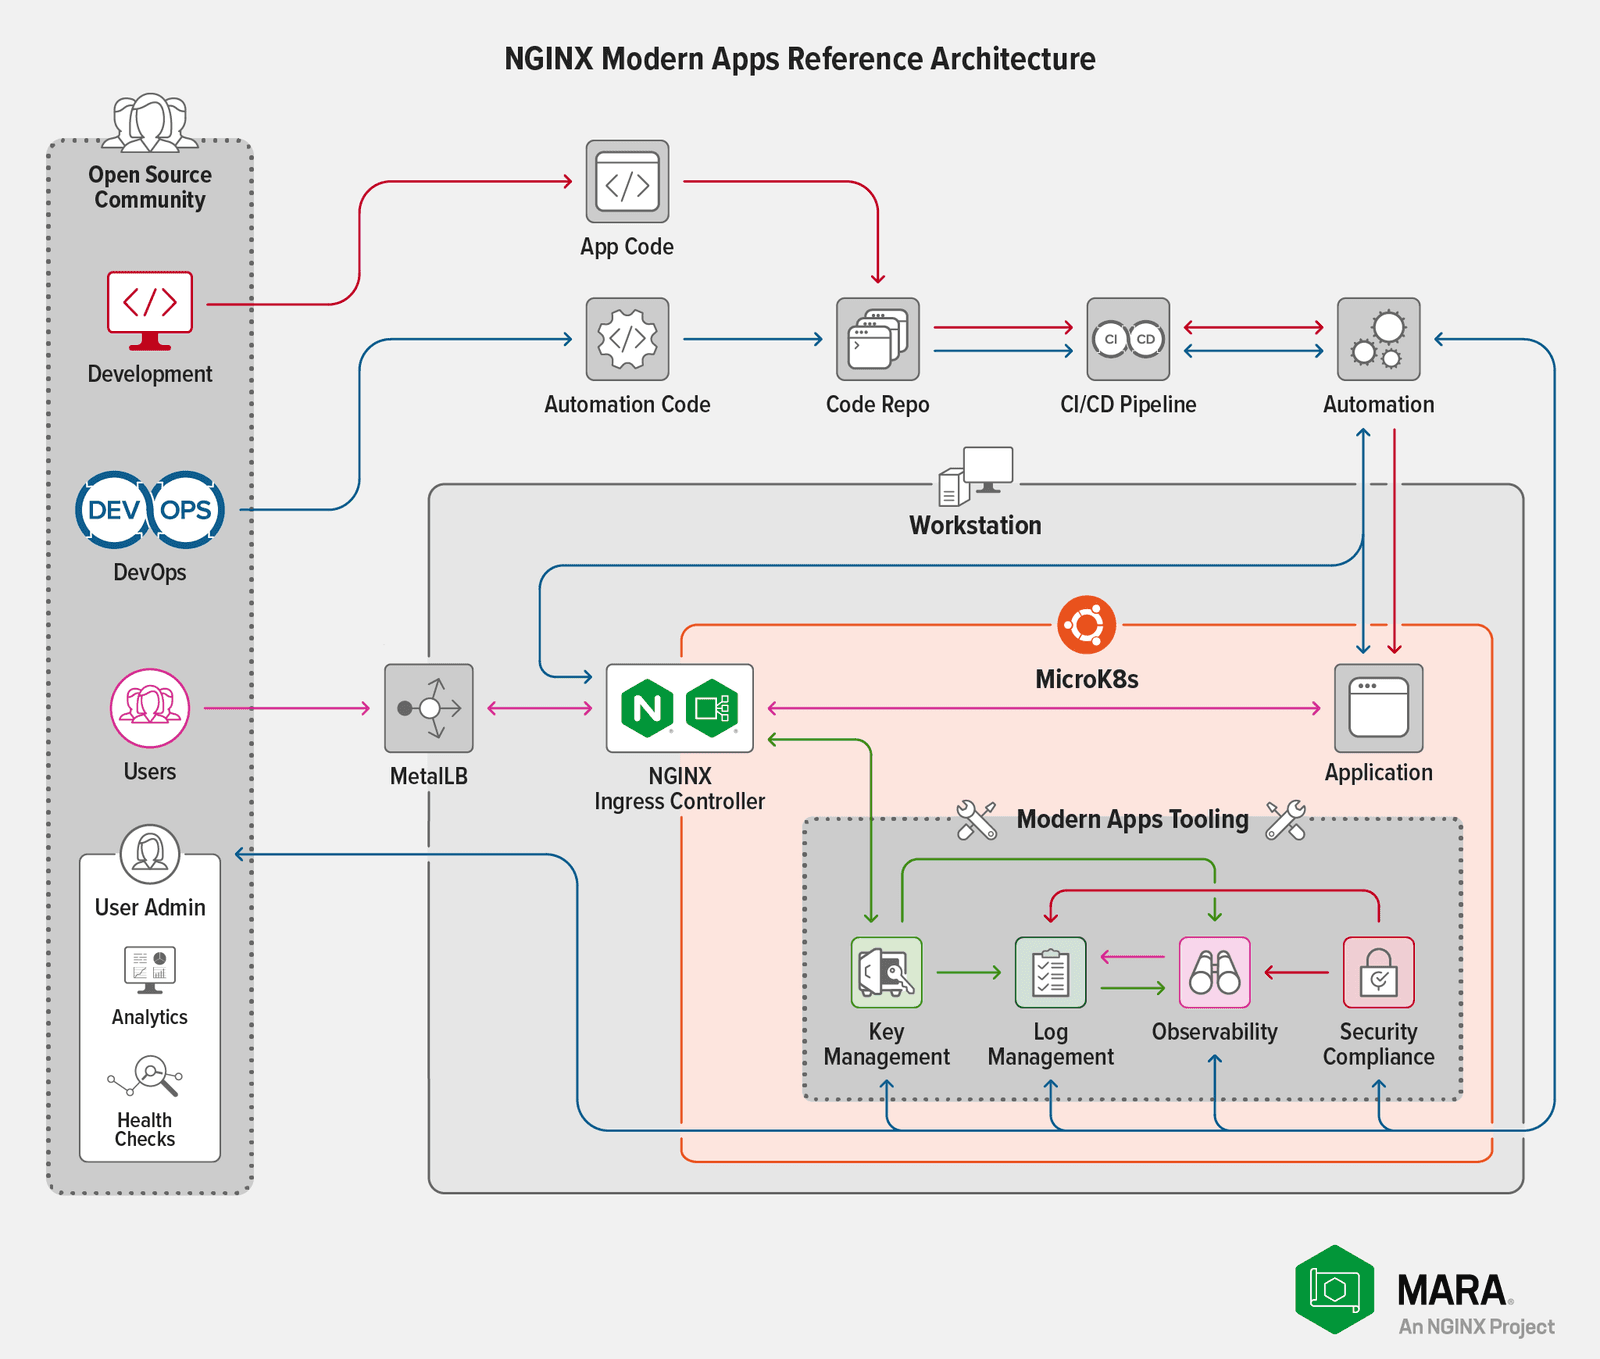
Why did we choose MicroK8s for our testing? Because it provides the DNS, storage, and egress capabilities that MARA needs, in an easy-to-deploy model with a low memory footprint. With MicroK8s, we can easily and repeatedly iterate through testing scenarios to determine the minimum requirements for deployments that deliver reasonable levels of performance.
Our expectation is that this work will facilitate our testing of other Kubernetes distributions; for information about the current status of various distributions, see our GitHub repo. If you have a favorite distribution you want to see on the list, we invite you to fork, test, and create pull requests!
Dealing with Resource Constraints
The biggest constraints to running MARA locally are memory and CPU. During preliminary testing, we found that the bulk of issues with memory exhaustion concerned Elasticsearch. Kibana is nearly unusable in configurations with an extremely small amount of memory (less than 16 GB). To address this issue, we have provided settings in the MARA configuration file that eliminate the redundancy protections a full Elasticsearch deployment normally has. Although this increases the number of failure modes, that’s a necessary trade‑off in resource‑constrained environments.
Constraints on CPU are directly linked to the amount of load imposed on our sample Bank of Sirius application. The MARA deployment includes Locust to generate load on Bank of Sirius, with user‑controlled settings for number of users and the spawn rate for new users.
Note that increasing the load on Bank of Sirius also affects the rest of the system. If either the user count or the spawn rate is too high, MARA performance degrades to the point where components are likely to crash or stall. The values that cause this behavior depend on the available CPU, but you can expect a deployment with at least the capacity specified in Requirements to handle the load created by up to 64 users and a span rate of 16 users at a time.
Deploying MARA on MicroK8s
With that background out of the way, you’re ready to stand up MARA on MicroK8s!
Requirements
rootaccess on a system (bare‑metal Linux server, virtualized, or cloud) running Ubuntu 20.04 (Focal) or later, with at minimum:- 20 GB disk
- 16 GB memory
- The equivalent of 4 CPUs
- A Python 3 virtual environment on the local system with all the libraries and binaries required by MARA. If Python 3 is not already installed, run these commands:
$ sudo apt update$ sudo apt install -y python3-venv- At least one free IPv4 address for MicroK8s’ integrated MetalLB load balancer to assign to the NGINX Ingress Controller egress. If you are accessing the Bank of Sirius application via localhost, any available private (RFC 1918-compliant) address is acceptable. For example, if your network is 192.168.100.0/24 you can use an address such as 10.10.10.10.
- A Pulumi account and access token. If you don’t already have these, you’ll create them in Step 1 of Deploy MARA.Note that while Pulumi lets you store the state file in an S3‑compatible object store or on the local filesystem, MARA does not support this at the time of writing. This limitation will be removed in a future release of MARA or Pulumi.
Install and Configure MicroK8s
- Install MicroK8s:
$ sudo snap install microk8s --classicmicrok8s (1.23/stable) v1.23.3 from Canonical✓ installed- Set the necessary permissions for running
microk8scommands. For<username>, substitute your account that hasrootprivilege on the system:
$ sudo usermod -a -G microk8s <username>$ sudo chown -f -R <username> ~/.kube
$ newgrp microk8s- Log out of your root‑privileged account and back in for the new permissions to take effect.
- Enable the MicroK8s add‑ons for DNS, storage, and MetalLB.At the prompt, specify an IP address range of the form
X.X.X.X‑X.X.X.Yto represent either:
$ microk8s enable dns storage metallbEnabling DNS
Applying manifest
...
Restarting kubelet
DNS is enabled
Enabling default storage class
...
Storage will be available soon
Enabling MetalLB
Enter each IP address range delimited by comma (e.g. '10.64.140.43-10.64.140.49,192.168.0.105-192.168.0.111'): 192.168.100.100-192.168.100.110
Applying Metallb manifest
...
MetalLB is enabled- An actual range of private IP addresses (for example,
192.168.100.100-192.168.100.110, the value used below) - A single private IP address (for example,
192.168.100.100-192.168.100.100)
- Confirm that MicroK8s is running:
$ microk8s statusmicrok8s is running
high-availability: no
  datastore master nodes: 127.0.0.1:19001
  datastore standby nodes: none
addons:
  enabled:
    dns           # CoreDNS
    ha-cluster    # Configure high availability on the current node
    metallb       # Loadbalancer for your Kubernetes cluster
    storage       # Storage class; allocates storage from host directory
...- Load the MicroK8s configuration into the file where most utilities expect to find it (~/.kube/config) and set the recommended permissions on the directory and file:
$ microk8s config > ~/.kube/config$ sudo chmod 0644 ~/.kube/configClone the MARA Repo and Set Up the MicroK8s Cluster
- Clone the MARA repository and initialize the Bank of Sirius submodule:
$ git clone https://github.com/nginxinc/kic-reference-architectures.git$ cd kic-reference-architectures/
$ git submodule update --init --recursive --remote- Working in the root directory of the cloned MARA repo (you changed directory there in the previous step), set up the Python virtual environment for the MicroK8s cluster:
$ ./bin/setup_venv.sh- This command generates a lengthy trace. If there are errors, please check the Known Issues/Caveats section at the MARA GitHub repo for suggestions.
- Activate the Python virtual environment. The command sets your
PATHand other environment variables to use the virtual environment:
$ source ./pulumi/python/venv/bin/activate- Confirm that the MicroK8s cluster is configured correctly for the MARA deployment:
$ ./bin/testcap.sh
This script will perform testing on the current kubernetes installation using the currently active kubernetes configuration and context.
Any failures should be investigated, as they will indicate that the installation does not meet the minimum set of capabilities required to run MARA.

...
==============================================================
| All tests passed! This system meets the basic requirements |
| to deploy MARA.                                            |
==============================================================
Deploy MARA
The start.sh script, which is used in this section to deploy MARA, accommodates options that require additional actions for the deployment to succeed. For the sake of simplicity, here we assume a basic deployment that:
- Uses kubeconfig files rather than one of the other supported deployment options. For details about the other options, see the Getting Started Guide at our GitHub repo.
- Uses the most recent version of NGINX Open Source with which we have tested MARA (not necessarily the very latest version).
- Uses the NGINX Ingress Controller based on NGINX Open Source. If you want to use the NGINX Ingress Controller based on NGINX Plus, you must use an NGINX Plus-based image from the F5 Docker registry in your Kubernetes cluster. See the first
NOTICE!in Step 3 below for more information. - Uses a single standard Kubernetes context. See the second
NOTICE!in Step 3.
Deploy MARA in the MicroK8s cluster:
- Run the
start.shscript. If you have not already configured your workstation to use Pulumi, you are directed to log in to Pulumi (creating an account if necessary) and then prompted for the API token associated with your Pulumi account.
$ ./bin/start.shAdding to [/home/ubuntu/kic-reference-architectures/bin/venv/bin] to PATH
Manage your Pulumi stacks by logging in.
Run `pulumi login --help` for alternative login options.
Enter your access token from https://app.pulumi.com/account/tokens
    or hit <ENTER> to log in using your browser            : <token>

Please read the documentation for more details.- Select the deployment type, typing
kat the prompt to build the deployment with kubeconfig files. Ignore the warnings aboutmakeand Docker not being installed – the deployment uses an NGINX Ingress Controller image from a registry instead.
Type a for AWS, k for kubeconfig? k
Calling kubeconfig startup script
make is not installed - it must be installed if you intend to build NGINX Kubernetes Ingress Controller from source.
docker is not installed - it must be installed if you intend to build NGINX Kubernetes Ingress Controller from source.- At the prompt, specify the name of the Pulumi stack to create (here,
mara). It must be unique within your Pulumi account.
Enter the name of the Pulumi stack to use in all projects: maraSubmodule source found
Configuring all Pulumi projects to use the stack: mara
Created stack 'mara'

NOTICE! Currently the deployment via kubeconfig only supports pulling images from the registry! A JWT is required in order to access the NGINX Plus repository. This should be placed in a file in the extras directory in the root, in a file named jwt.token

See https://docs.nginx.com/nginx-ingress-controller/installation/using-the-jwt-token-docker-secret/ for more details and examples.

No JWT found; writing placeholder manifest

NOTICE! When using a kubeconfig file you need to ensure that your environment is configured to connect to Kubernetes properly. If you have multiple kubernetes contexts (or custom contexts) you may need to remove them and replace them with a simple ~/.kube/config file. This will be addressed in a future release.- At the prompts, specify the full path to your kubeconfig file and the name of the cluster. Here they are
/home/<username>/.kube/configandmicrok8s-cluster.
Provide an absolute path to your kubeconfig filevalue: /home/<username>/.kube/config
Provide your clustername
value: microk8s-cluster
Attempting to connect to kubernetes cluster- Specify the fully qualified domain name (FQDN) for the cluster at the next prompt. The script uses the FQDN for two purposes: to configure NGINX Ingress Controller and to create the self‑signed certificate (the second use means that the value cannot be an IP address). If you substitute a different FQDN for
mara.example.com, remember to use it in the following steps as well.
Create a fqdn for your deploymentvalue: mara.example.com- Specify the Grafana admin password:
Create a password for the grafana admin user; this password will be used to access the Grafana dashboardThis should be an alphanumeric string without any shell special characters; it is presented in plain text due to current limitations with Pulumi secrets. You will need this password to access the Grafana dashboard.
value: <password>
A trace of the installation process appears, displaying the following information for each step:
- A banner describing the key action performed in the step (for example,
Logstoresignals the start of the Elasticsearch deployment) - A list of the tasks Pulumi is going to perform
- A real‑time status indicator for each Pulumi task
- Diagnostics generated by Pulumi and MARA, for example, the defined hostname and IP address
- The number of resources affected
- The elapsed time
When the final step (for Bank of Sirius) completes, the trace reports the IP address assigned to NGINX Ingress Controller by MetalLB (here 192.168.100.100) and the FQDN you chose for the deployment (here mara.example.com) along with other information about the deployment.
The startup process has finished successfully
Next Steps:
1. Map the IP address (192.168.100.100) of your Ingress Controller with your FQDN (mara.example.com).
2. Use the ./bin/test-forward.sh program to establish tunnels you can use to connect to the management tools.
3. Use kubectl, k9s, or the Kubernetes dashboard to explore your deployment.

To review your configuration options, including the passwords defined, you can access the pulumi secrets via the following commands:

Main Configuration: pulumi config -C /jenkins/workspace/jaytest/bin/../pulumi/python/config

Bank of Sirius (Example Application) Configuration: pulumi config -C /jenkins/workspace/jaytest/bin/../pulumi/python/kubernetes/applications/sirius

K8 Loadbalancer IP: kubectl get services --namespace nginx-ingress

Please see the documentation in the github repository for more information- Create a mapping between the FQDN and IP address reported in the previous step, in the tool you use for resolving FQDNs (such as the local /etc/hosts file or DNS server).
- Verify that a request to the MARA deployment succeeds. Include the
-koption socurlaccepts a self‑signed certificate. To display more information about the certificate, add the-voption.
$ curl -k -I https://mara.example.comHTTP/1.1 200 OK
Server: nginx/1.21.5
Date: Day, DD Mon YYYY hh:mm:ss TZ
Content-Type: text/html; charset=utf-8
Content-Length: 7016
Connection: keep-alive- Navigate in a browser to https://mara.example.com to display the Bank of Sirius website. At the time of writing, with many browsers (including Firefox and Safari) you can safely click through the warning that appears about the site using a self‑signed certificate. We recommend that you do not use Chrome – because of recent security changes, it is likely to prohibit you from accessing the site.
- Run the
test-forward.shscript to set up Kubernetes port forwarding so you can access the tools in the MARA management suite – Elasticsearch, Grafana, Kibana, Locust, and Prometheus. The script determines the appropriate service names and runskubectlcommands to forward them to local ports. Note: For port forwarding to work correctly, your browser must be running on the same system as the command shell where you run this command. If not (because you’re using a virtualization environment, for example), the command appears to succeed but port forwarding doesn’t actually work. For more information, see Accessing the Management Tools in MARA at our GitHub repo.
$ ./bin/test-forward.shConnections Details
====================================
Kibana:        http://localhost:5601
Grafana:       http://localhost:3000
Locust:        http://localhost:8089
Prometheus:    http://localhost:9090
Elasticsearch: http://localhost:9200
====================================

Issue Ctrl-C to Exit
Summary
That’s it! With these instructions, a working MARA deployment is up and running in your environment within about 20 minutes. At this point, you can interact with the Bank of Sirius application like any other Kubernetes application. A good place to start is using the built‑in observability tools to test how the environment behaves as you generate differing amounts of load with Locust.
Our goal is to make MARA as useful as possible for as many Kubernetes users as possible. Don’t like the choices we’ve made for some of the components? We encourage you to substitute in your components and open a pull request if you want to share. Also, please share thoughts and ask questions – including about any questionable assumptions we’ve made – on the Issues and Discussions pages at our repo.
Related Posts
This post is part of a series. As we add capabilities to MARA over time, we’re publishing the details on the blog:
- A New, Open Source Modern Apps Reference Architecture
- Integrating OpenTelemetry into the Modern Apps Reference Architecture – A Progress Report
- MARA: Now Running on a Workstation Near You (this post)
- Announcing Version 1.0.0 of the NGINX Modern Apps Reference Architecture
About the Author
Related Blog Posts

Automating Certificate Management in a Kubernetes Environment
Simplify cert management by providing unique, automatically renewed and updated certificates to your endpoints.

Secure Your API Gateway with NGINX App Protect WAF
As monoliths move to microservices, applications are developed faster than ever. Speed is necessary to stay competitive and APIs sit at the front of these rapid modernization efforts. But the popularity of APIs for application modernization has significant implications for app security.
How Do I Choose? API Gateway vs. Ingress Controller vs. Service Mesh
When you need an API gateway in Kubernetes, how do you choose among API gateway vs. Ingress controller vs. service mesh? We guide you through the decision, with sample scenarios for north-south and east-west API traffic, plus use cases where an API gateway is the right tool.
Deploying NGINX as an API Gateway, Part 2: Protecting Backend Services
In the second post in our API gateway series, Liam shows you how to batten down the hatches on your API services. You can use rate limiting, access restrictions, request size limits, and request body validation to frustrate illegitimate or overly burdensome requests.
New Joomla Exploit CVE-2015-8562
Read about the new zero day exploit in Joomla and see the NGINX configuration for how to apply a fix in NGINX or NGINX Plus.
Why Do I See “Welcome to nginx!” on My Favorite Website?
The ‘Welcome to NGINX!’ page is presented when NGINX web server software is installed on a computer but has not finished configuring