
NGINX has long been recognized as one of the top choices for powering high-performance web servers and load balancers. However, with the rise of microservices architectures and the need for efficient API management, NGINX has also become a popular choice for building API gateways.
In this blog, we will explore how to transform an OpenAPI schema definition into a fully functioning NGINX configuration running as an API Gateway with Web Application Firewall security and a Developer Portal using a declarative API approach.
We will provide step-by-step instructions and insights on how to leverage NGINX Plus to streamline your API management processes and ensure optimal performance for your applications.
Introducing the API Gateway
An API gateway serves as a central hub for managing and securing the communication between clients and backend services. It acts as a reverse proxy that sits between the client and the backend servers, routing incoming requests, and distributing them to the appropriate services. This allows for more efficient communication between the client and the services, as well as enabling the API gateway to handle tasks such as authentication, authorization, rate limiting, and caching.
Additionally, an API gateway can act as a security layer, protecting the backend services from potential threats and attacks. It can enforce security measures such as encryption, token-based authentication, and access control, ensuring that only authorized users can access the services. By consolidating and managing these security features in a single place, the API gateway helps to simplify the overall security architecture of the system and reduce the complexity of implementing security measures across multiple services.
NGINX Declarative API Project
The community-supported NGINX Declarative API project provides a set of declarative REST API for NGINX Instance Manager.
It can be used to manage NGINX Plus configuration lifecycles and to create NGINX Plus configurations using JSON service definitions. GitOps integration is supported when used with NGINX Instance Manager: source of truth is checked for referenced objects updates and NGINX configurations are automatically kept in sync.
OpenAPI schemas can be used to automatically configure NGINX as an API Gateway. Developer portal creation is supported through Redocly.
Prerequisites
To run the contents of this blog, you need:
- A running instance of NGINX Instance Manager
- A subscription (or 30-day free trial) for NGINX Plus and NGINX App Protect WAF. NGINX Agent must be installed to connect to NGINX Instance Manager and be part of the
declarativeAPITestinstance group - A Linux host (bare metal or VM) with docker and docker-compose to run the NGINX Declarative API project
- Postman to submit the declarative API requests
- A client host to run Postman
Lab Overview
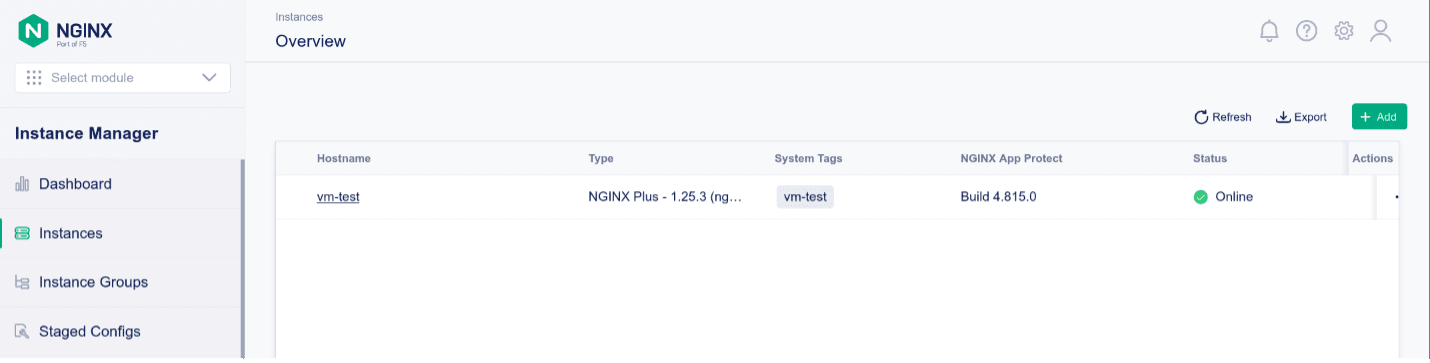
After installing and running all prerequisites NGINX Instance Manager shows the NGINX Plus instance as online with NGINX App Protect WAF.
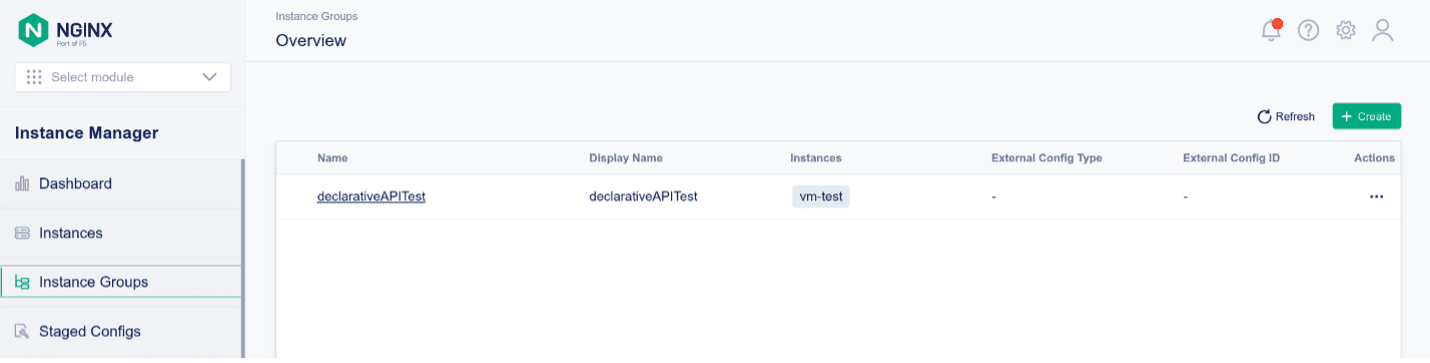
The NGINX Plus instance is part of the declarativeAPITest Instance Group
Deploying the Declarative API
The NGINX Declarative API project relies on the REST API provided by NGINX Instance Manager and provides the declarative, JSON-based abstraction. Follow these instructions to run the Declarative API Project:
1. Run docker ps to verify that Docker is running:
f5@ubuntu:~$ docker ps
CONTAINER ID   IMAGE     COMMAND   CREATED   STATUS    PORTS     NAMES
2. On the Linux host clone the Github repository:
f5@ubuntu:~$ git clone https://github.com/f5devcentral/NGINX-Declarative-API/
Cloning into 'NGINX-Declarative-API'...
remote: Enumerating objects: 4072, done.
remote: Counting objects: 100% (1982/1982), done.
remote: Compressing objects: 100% (1332/1332), done.
remote: Total 4072 (delta 668), reused 876 (delta 609), pack-reused 2090
Receiving objects: 100% (4072/4072), 19.05 MiB | 4.88 MiB/s, done.
Resolving deltas: 100% (1154/1154), done.
f5@ubuntu:~$
3. Change to the docker-compose directory:
f5@ubuntu:~$ cd NGINX-Declarative-API/contrib/docker-compose/
4. Use the nginx-dapi.sh script to start all containers through docker-compose. During the initial startup all docker images are built automatically:
f5@ubuntu:~/NGINX-Declarative-API/contrib/docker-compose$ ./nginx-dapi.sh -c start
-> Updating docker images
[+] Pulling 11/11
[...]
-> Deploying NGINX Declarative API
[+] Running 4/4
 ✔ Network nginx-dapi_dapi-network  Created 0.1s
 ✔ Container redis                  Started 1.5s
 ✔ Container devportal              Started 1.5s
 ✔ Container nginx-dapi             Started
5. Check running docker containers:
f5@ubuntu:~/NGINX-Declarative-API/contrib/docker-compose$ docker ps
CONTAINER ID   IMAGE                             COMMAND                  CREATED         STATUS         PORTS                                       NAMES
e29a2f783da2   nginx-declarative-api             "/deployment/env/bin…"   5 minutes ago   Up 5 minutes   0.0.0.0:5000->5000/tcp, :::5000->5000/tcp   nginx-dapi
97142840eaf7   redis                             "docker-entrypoint.s…"   5 minutes ago   Up 5 minutes   0.0.0.0:6379->6379/tcp, :::6379->6379/tcp   redis
6b50c0426643   nginx-declarative-api-devportal   "/deployment/src/sta…"   5 minutes ago   Up 5 minutes   0.0.0.0:5001->5000/tcp, :::5001->5000/tcp   devportal
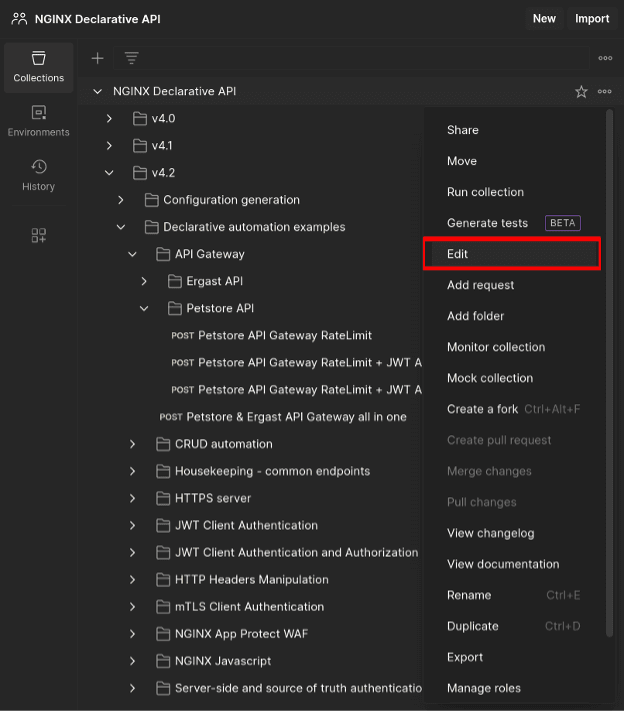
6. On the client host run Postman and import the NGINX Declarative API collection at https://raw.githubusercontent.com/f5devcentral/NGINX-Declarative-API/main/contrib/postman/NGINX%20Declarative%20API.postman_collection.json
7. Edit the Postman collection variables to adjust them to your environment:
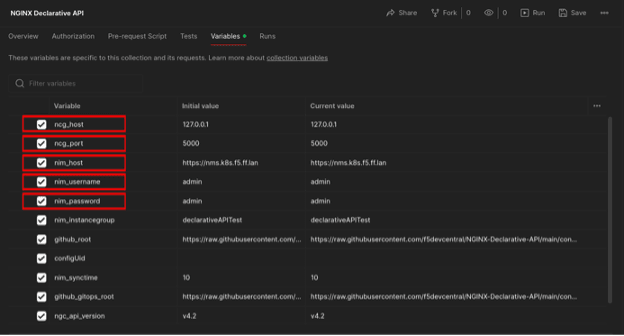
8. Set the following variables:
ncg_host- hostname or IP address of the Linux host where the Declarative API docker-compose is runningncg_port- TCP port for the NGINX Declarative API: 5000 is the defaultnim_host- NGINX Instance Manager base URL (ie. https://nms.k8s.ie.ff.lan)nim_username- NGINX Instance Manager authentication usernamenim_password- NGINX Instance Manager authentication password
9. Save all changes on Postman
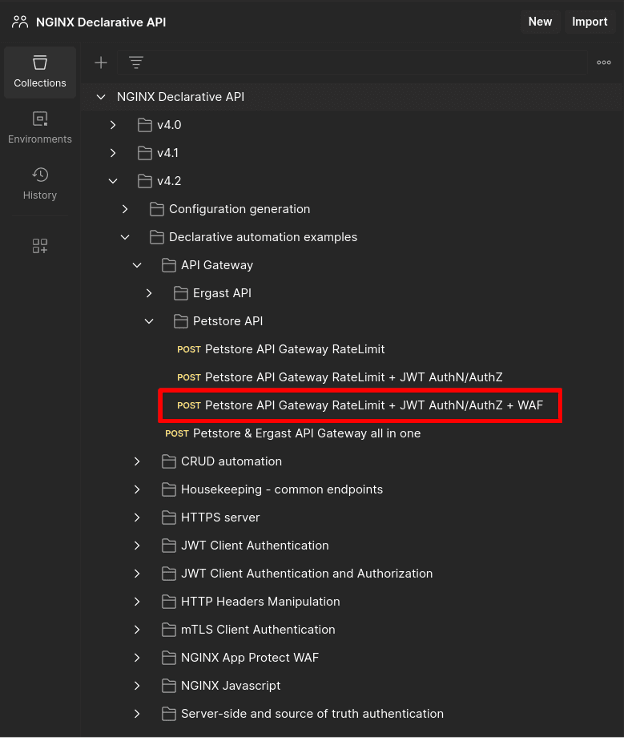
10. In the Postman collection browse to Petstore API Gateway RateLimit + JWT AuthN/AuthZ + WAF and open the request
The JSON declaration looks as follows:
{
    "output": {
        "type": "nms",
        "nms": {
            "url": "{{nim_host}}",
            "username": "{{nim_username}}",
            "password": "{{nim_password}}",
            "instancegroup": "{{nim_instancegroup}}",
            "synctime": 0,
            "modules": [
                "ngx_http_app_protect_module"
            ],
            "certificates": [
                {
                    "type": "certificate",
                    "name": "test_cert",
                    "contents": {
                        "content": "{{github_gitops_root}}/v4.2/testcert.crt"
                    }
                },
                {
                    "type": "key",
                    "name": "test_key",
                    "contents": {
                        "content": "{{github_gitops_root}}/v4.2/testcert.key"
                    }
                }
            ],
            "policies": [
                {
                    "type": "app_protect",
                    "name": "production-policy",
                    "active_tag": "xss-blocked",
                    "versions": [
                        {
                            "tag": "xss-blocked",
                            "displayName": "Production Policy - XSS blocked",
                            "description": "This is a production-ready policy - XSS blocked",
                            "contents": {
                                "content": "{{github_gitops_root}}/v4.2/nap-policy-xss-blocked-bot-allowed.json"
                            }
                        },
                        {
                            "tag": "xss-allowed",
                            "displayName": "Production Policy - XSS allowed",
                            "description": "This is a production-ready policy - XSS allowed",
                            "contents": {
                                "content": "{{github_gitops_root}}/v4.2/nap-policy-xss-allowed.json"
                            }
                        }
                    ]
                }
            ]
        }
    },
    "declaration": {
        "http": {
            "servers": [
                {
                    "name": "Petstore API",
                    "names": [
                        "apigw.nginx.lab"
                    ],
                    "resolver": "8.8.8.8",
                    "listen": {
                        "address": "0.0.0.0:443",
                        "http2": true,
                        "tls": {
                            "certificate": "test_cert",
                            "key": "test_key",
                            "ciphers": "DEFAULT",
                            "protocols": [
                                "TLSv1.2",
                                "TLSv1.3"
                            ]
                        }
                    },
                    "log": {
                        "access": "/var/log/nginx/apigw.nginx.lab-access_log",
                        "error": "/var/log/nginx/apigw.nginx.lab-error_log"
                    },
                    "locations": [
                        {
                            "uri": "/petstore",
                            "urimatch": "prefix",
                            "apigateway": {
                                "openapi_schema": {
                                    "content": "http://petstore.swagger.io/v2/swagger.json"
                                },
                                "api_gateway": {
                                    "enabled": true,
                                    "strip_uri": true,
                                    "server_url": "https://petstore.swagger.io/v2"
                                },
                                "developer_portal": {
                                    "enabled": true,
                                    "uri": "/petstore-devportal.html"
                                },
                                "authentication": {
                                    "client": [
                                        {
                                            "profile": "Petstore JWT Authentication"
                                        }
                                    ],
                                    "enforceOnPaths": true,
                                    "paths": [
                                        "/user/login",
                                        "/user/logout"
                                    ]
                                },
                                "authorization": [
                                    {
                                        "profile": "JWT role based authorization",
                                        "enforceOnPaths": true,
                                        "paths": [
                                            "/user/login",
                                            "/user/logout"
                                        ]
                                    }
                                ],
                                "rate_limit": [
                                    {
                                        "profile": "petstore_ratelimit",
                                        "httpcode": 429,
                                        "burst": 0,
                                        "delay": 0,
                                        "enforceOnPaths": true,
                                        "paths": [
                                            "/user/login",
                                            "/user/logout"
                                        ]
                                    }
                                ]
                            },
                            "log": {
                                "access": "/var/log/nginx/petstore-access_log",
                                "error": "/var/log/nginx/petstore-error_log"
                            },
                            "app_protect": {
                                "enabled": true,
                                "policy": "production-policy",
                                "log": {
                                    "profile_name": "secops_dashboard",
                                    "enabled": true,
                                    "destination": "127.0.0.1:514"
                                }
                            }
                        }
                    ]
                }
            ],
            "rate_limit": [
                {
                    "name": "petstore_ratelimit",
                    "key": "$binary_remote_addr",
                    "size": "10m",
                    "rate": "2r/s"
                }
            ],
            "authentication": {
                "client": [
                    {
                        "name": "Petstore JWT Authentication",
                        "type": "jwt",
                        "jwt": {
                            "realm": "Petstore Authentication",
                            "key": "{\"keys\": [{\"k\":\"ZmFudGFzdGljand0\",\"kty\":\"oct\",\"kid\":\"0001\"}]}",
                            "cachetime": 5
                        }
                    }
                ]
            },
            "authorization": [
                {
                    "name": "JWT role based authorization",
                    "type": "jwt",
                    "jwt": {
                        "claims": [
                            {
                                "name": "roles",
                                "value": [
                                    "~(devops)"
                                ],
                                "errorcode": 403
                            }
                        ]
                    }
                }
            ]
        }
    }
}
The output section defines:
- The NGINX Instance Manager server the Declarative API will publish the NGINX configuration to
- TLS certificates and keys - these can be referenced by the URL of the source of truth where they are stored
- NGINX App protect WAF security policies - these can be referenced by the URL of the source of truth where they are stored
The declaration section describes:
- The NGINX server to be created
- Whether or not TLS offload is performed
- Where to log access and error entries
- The
/petstorebase URI where the API Gateway configuration will be deployed and be made accessible to clients - The API Gateway configuration and developer portal to be published
- How NGINX App Protect WAF is enabled, what security policy to use and where to log security violations to
- How to authenticate and authorize client requests
The API Gateway declaration section describes how the declarative API will deliver its outcome.
The OpenAPI schema is referenced through its full URL:
"apigateway": {
    "openapi_schema": {
        "content": "http://petstore.swagger.io/v2/swagger.json"
    },
Creation of the NGINX API Gateway configuration is requested, and the upstream server is defined. When NGINX reverse proxies requests to the upstream, the /petstore base URI is removed:
"api_gateway": {
        "enabled": true,
        "strip_uri": true,
        "server_url": "https://petstore.swagger.io/v2"
    },
Developer portal creation and deployment under a specific URI is requested:
"developer_portal": {
        "enabled": true,
        "uri": "/petstore-devportal.html"
    },
Clients authentication based on the specified client authentication profile is enforced for /user/login and /user/logout:
"authentication": {
        "client": [
            {
                "profile": "Petstore JWT Authentication"
            }
        ],
        "enforceOnPaths": true,
        "paths": [
            "/user/login",
            "/user/logout"
        ]
    },
Clients authorization based on the specified client authorization profile is enforced for /user/login and /user/logout:
"authorization": [
        {
            "profile": "JWT role based authorization",
            "enforceOnPaths": true,
            "paths": [
                "/user/login",
                "/user/logout"
            ]
        }
    ],
Rate limiting is applied for /user/login and /user/logout based on the specified profile:
"rate_limit": [
        {
            "profile": "petstore_ratelimit",
            "httpcode": 429,
            "burst": 0,
            "delay": 0,
            "enforceOnPaths": true,
            "paths": [
                "/user/login",
                "/user/logout"
            ]
        }
    ]
},
12. Use the Postman Send button to publish the request to the declarative API. The response is similar to:
{
    "code": 200,
    "content": {
        "createTime": "2024-04-26T17:09:10.419574328Z",
        "details": {
            "failure": [],
            "pending": [],
            "success": [
                {
                    "name": "vm-test"
                }
            ]
        },
        "id": "1060ec49-120e-45ca-820b-5203c8b3538d",
        "message": "Instance Group config successfully published to declarativeAPITest",
        "status": "successful",
        "updateTime": "2024-04-26T17:09:10.881509913Z"
    },
    "configUid": "eecf1da6-9d8f-4e44-89cc-a470af79379d"
}
13. At this stage the NGINX instance is configured as an API Gateway, WAF security is enforced and the developer portal is published.
Testing the API Gateway
Note: it is assumed that the FQDN apigw.nginx.lab resolves to the IP address of the virtual machine where the NGINX instance is running
1. Change to the jwt directory:
f5@ubuntu:~$ cd ~/NGINX-Declarative-API/contrib/gitops-examples/jwt
2. Access an unauthenticated REST API endpoint:
$ curl -w '\n' -ki https://apigw.nginx.lab/petstore/store/inventory
HTTP/2 200
date: Fri, 26 Apr 2024 17:13:54 GMT
content-type: application/json
access-control-allow-origin: *
access-control-allow-methods: GET, POST, DELETE, PUT
access-control-allow-headers: Content-Type, api_key, Authorization

{"totvs":5,"aut":1,"FORsold":1,[...]
3. Rate limiting:
    $ curl -w '\n' -ki https://apigw.nginx.lab/petstore/user/login;curl -w '\n' -ki
    https://apigw.nginx.lab/petstore/user/login
    HTTP/2 401
    date: Fri, 26 Apr 2024 17:14:51 GMT
    content-type: text/html
    content-length: 179
    www-authenticate: Bearer realm="Petstore Authentication"
    <html>
    <head><title>401 Authorization Required</title></head>
    <body>
    <center><h1>401 Authorization Required</h1></center>
    <hr><center>nginx/1.25.3</center>
    </body>
    </html>
    HTTP/2 429
    date: Fri, 26 Apr 2024 17:14:51 GMT
    content-type: text/html
    content-length: 169
    <html>
    <head><title>429 Too Many Requests</title></head>
    <body>
    <center><h1>429 Too Many Requests</h1></center>
    <hr><center>nginx/1.25.3</center>
    </body>
    </html>
4. Authentication and valid authorization:
$ curl -w '\n' -ki https://apigw.nginx.lab/petstore/user/login -H "Authorization: Bearer `cat jwt.devops`"
HTTP/2 200
date: Fri, 26 Apr 2024 17:15:41 GMT
content-type: application/json
access-control-allow-origin: *
access-control-allow-methods: GET, POST, DELETE, PUT
access-control-allow-headers: Content-Type, api_key, Authorization
x-expires-after: Fri Apr 26 18:15:41 UTC 2024
x-rate-limit: 5000

{"code":200,"type":"unknown","message":"logged in user session:1714151741883"}
5. Authentication and invalid authorization:
$ curl -w '\n' -ki https://apigw.nginx.lab/petstore/user/login -H "Authorization: Bearer `cat jwt.guest`"
HTTP/2 403
date: Fri, 26 Apr 2024 17:16:07 GMT
content-type: text/html
content-length: 153
<html>
<head><title>403 Forbidden</title></head>
<body>
<center><h1>403 Forbidden</h1></center>
<hr><center>nginx/1.25.3</center>
</body>
</html>
6. NGINX App Protect WAF and Cross-Site Scripting security violation:
$ curl -w '\n' -ki "https://apigw.nginx.lab/petstore/store/inventory?
"
HTTP/2 200
content-type: text/html; charset=utf-8
cache-control: no-cache
pragma: no-cache
content-length: 246
7. The developer portal can be accessed browsing to
https://apigw.nginx.lab/petstore/petstore-devportal.html
Get Started
To try out the NGINX solutions discussed in this post, start a 30-day free trial today or contact us to discuss your use cases:
Download NGINX Agent – it’s free and open source.
About the Author

Related Blog Posts

Automating Certificate Management in a Kubernetes Environment
Simplify cert management by providing unique, automatically renewed and updated certificates to your endpoints.

Secure Your API Gateway with NGINX App Protect WAF
As monoliths move to microservices, applications are developed faster than ever. Speed is necessary to stay competitive and APIs sit at the front of these rapid modernization efforts. But the popularity of APIs for application modernization has significant implications for app security.
How Do I Choose? API Gateway vs. Ingress Controller vs. Service Mesh
When you need an API gateway in Kubernetes, how do you choose among API gateway vs. Ingress controller vs. service mesh? We guide you through the decision, with sample scenarios for north-south and east-west API traffic, plus use cases where an API gateway is the right tool.
Deploying NGINX as an API Gateway, Part 2: Protecting Backend Services
In the second post in our API gateway series, Liam shows you how to batten down the hatches on your API services. You can use rate limiting, access restrictions, request size limits, and request body validation to frustrate illegitimate or overly burdensome requests.
New Joomla Exploit CVE-2015-8562
Read about the new zero day exploit in Joomla and see the NGINX configuration for how to apply a fix in NGINX or NGINX Plus.
Why Do I See “Welcome to nginx!” on My Favorite Website?
The ‘Welcome to NGINX!’ page is presented when NGINX web server software is installed on a computer but has not finished configuring